Dirt Cups
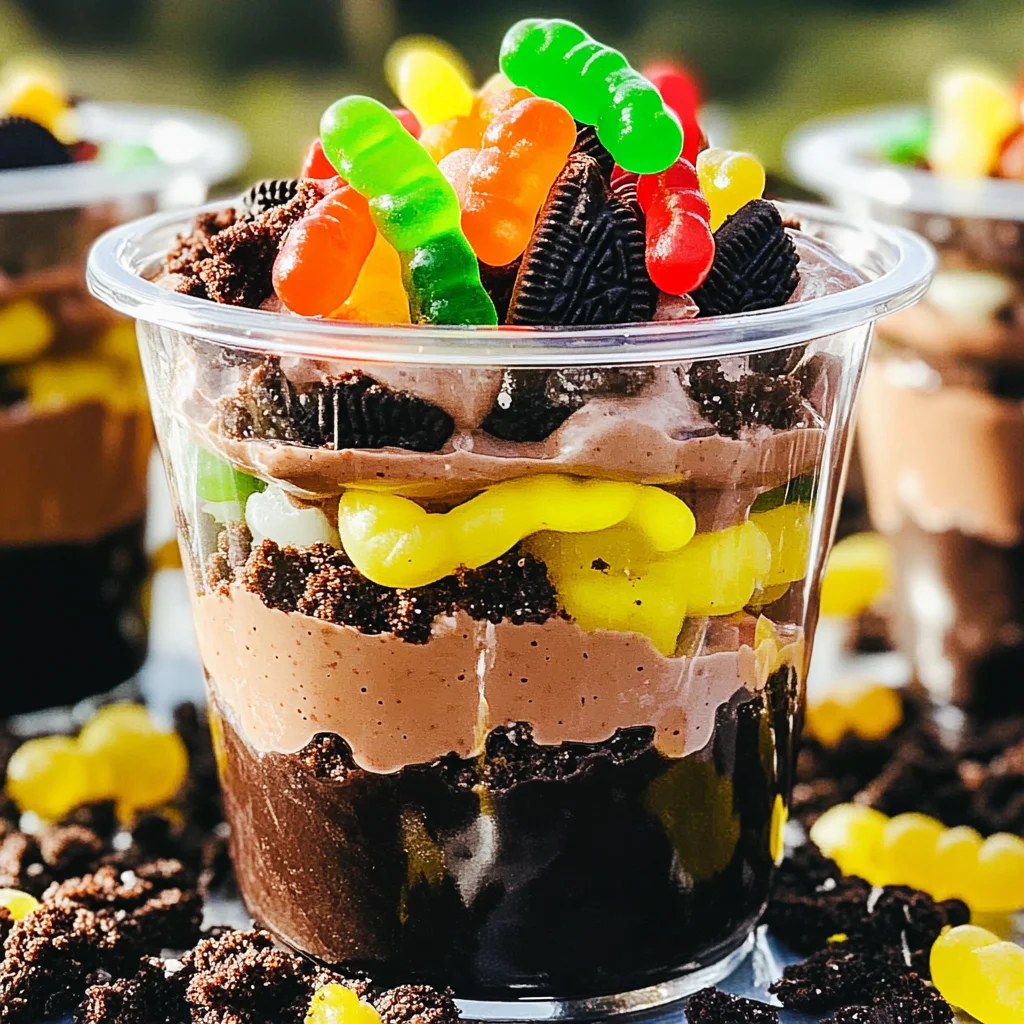
Dirt Cups are a fun and delicious treat that everyone will love! Perfect for birthday parties, Halloween gatherings, or just a cozy family movie night, these delightful cups combine layers of creamy chocolate pudding, crushed Oreos, and playful gummy worms. Their unique appearance and irresistible flavors make them a hit with both kids and adults alike.
Why You’ll Love This Recipe
- Easy to Make – With just a few simple steps, you can whip up these delightful cups in no time.
- Kid-Friendly Fun – The combination of chocolate pudding and gummy worms makes this dessert a favorite among children.
- Customizable – Feel free to mix in your favorite candies or adjust the layers to suit your taste!
- Perfect for Any Occasion – Whether it’s a birthday party or Halloween celebration, Dirt Cups are always a crowd pleaser.
- No Baking Required – Enjoy this delicious treat without the hassle of turning on the oven.

Tools and Preparation
Gathering the right tools will help make your Dirt Cups preparation smoother. Here’s what you’ll need:
Essential Tools and Equipment
- Mixing bowl
- Whisk
- Measuring cups
- Serving cups or glasses
- Spoon
Importance of Each Tool
- Mixing bowl – A large bowl allows you to easily combine all the ingredients without spills.
- Whisk – This tool ensures that the pudding mix is well blended with milk for a smooth texture.
- Serving cups or glasses – These enhance the presentation of your Dirt Cups, making them more inviting.
Ingredients
Layers of chocolate pudding, crushed Oreos topped with gummy worms!
For the Pudding Layer
- 3.4 ounces box instant chocolate pudding mix
- 2 cups milk
- 8 ounces whipped topping (thawed)
For the Topping
- 10-12 Oreo cookies (crushed)
- 32 gummy worms
How to Make Dirt Cups
Step 1: Prepare the Pudding Mixture
- In a medium bowl, add cold milk and sprinkle pudding over top.
- Whisk until well combined.
- Let sit for 5 minutes to thicken.
Step 2: Combine with Whipped Topping
- Gently fold in whipped topping until fully mixed in.
Step 3: Assemble Your Dirt Cups
- Spoon the pudding mixture into serving glasses or cups.
- Sprinkle crushed Oreo cookies on top of the pudding in each cup.
- Add 4 gummy worms on top of each cup for decoration.
Step 4: Chill and Serve
- Chill until ready to serve.
- Enjoy your delightful Dirt Cups!
How to Serve Dirt Cups
Dirt Cups make a fun and playful dessert that can be served in various ways. Their unique presentation combined with delicious flavors makes them perfect for parties, kids’ gatherings, or even a family movie night.
Individual Servings
- Use small cups or jars for a charming presentation. Each guest can enjoy their own portion.
Party Platter
- Arrange multiple cups on a large platter. This creates an eye-catching centerpiece at your dessert table.
Themed Decorations
- Add themed decorations like plastic insects or mini shovels to enhance the dirt look, especially for Halloween or outdoor-themed parties.
Layered Desserts
- For an added twist, layer different flavored puddings beneath the Oreos for varied taste and texture.
How to Perfect Dirt Cups
To ensure your Dirt Cups are a hit, consider these tips. They will help elevate your dessert game and impress your guests.
-
Chill before serving: Allow the Dirt Cups to chill in the refrigerator. This enhances the flavor and helps set the layers perfectly.
-
Use fresh ingredients: Fresh whipped topping and new Oreo cookies give the best taste and texture.
-
Customize toppings: Experiment with different candies like gummy spiders or chocolate rocks for a creative touch.
-
Make ahead of time: Prepare the cups a few hours in advance. This saves time and allows for better flavor melding.
Best Side Dishes for Dirt Cups
Serving side dishes alongside Dirt Cups can create a balanced meal experience. Here are some delightful options:
-
Fruit Salad: A refreshing mix of seasonal fruits adds brightness to your dessert spread.
-
Cheese Platter: A selection of cheeses provides a savory contrast to the sweet pudding cups.
-
Veggie Sticks: Crisp vegetables with hummus or ranch dip offer a healthy crunch next to the rich Dirt Cups.
-
Mini Sandwiches: Small sandwiches filled with your choice of meats or veggies make for satisfying finger food.
-
Chocolate Chip Cookies: Classic cookies complement the chocolate flavor of the Dirt Cups perfectly.
-
Popcorn Mix: Sweet and salty popcorn adds an interesting texture and is always a crowd-pleaser.
Common Mistakes to Avoid
Avoiding common mistakes in making Dirt Cups can enhance your experience and the final product. Here are some pitfalls to watch for:
- Skipping the Thicking Step – Not allowing the pudding to thicken can result in a runny mixture. Make sure to let it sit for at least 5 minutes after whisking.
- Overmixing Whipped Topping – Mixing too hard can deflate the whipped topping, making it lose its light texture. Gently fold until just combined for best results.
- Not Using Enough Oreos – Failing to sprinkle a generous amount of crushed Oreos on top can make your Dirt Cups less visually appealing and flavorful. Aim for a good layer for that authentic dirt look!
- Using Warm Milk – Warm milk will not set the pudding correctly. Always use cold milk as specified in the recipe for proper thickening.
- Neglecting Chill Time – Serving immediately may lead to a less enjoyable texture. Refrigerate your Dirt Cups until ready to serve to enhance their taste and firmness.
Storage & Reheating Instructions
Refrigerator Storage
- Store Dirt Cups in airtight containers.
- They can be kept in the fridge for up to 3 days.
Freezing Dirt Cups
- Freeze in an airtight container if you need longer storage.
- They can last up to 2 months, but note that the texture may change after thawing.
Reheating Dirt Cups
- Oven – Not recommended, as this dessert is best served chilled.
- Microwave – Not suitable, as it may alter the texture of the pudding and whipped topping.
- Stovetop – Not applicable; enjoy your Dirt Cups cold!
Frequently Asked Questions
Here are some frequently asked questions about Dirt Cups that might help you perfect this delightful dessert.
What are Dirt Cups?
Dirt Cups are a fun and whimsical dessert made with layers of chocolate pudding, crushed Oreos, and gummy worms, perfect for kids’ parties or nostalgic adults.
How long do Dirt Cups last?
When stored properly in the refrigerator, Dirt Cups can last up to 3 days. For longer storage, consider freezing them.
Can I customize my Dirt Cups?
Absolutely! You can add different candies or toppings like chocolate sprinkles or edible glitter to personalize your Dirt Cups further.
What is the best way to serve Dirt Cups?
Serve them in clear cups or glasses so that everyone can see the layers. It’s not only delicious but also visually appealing!
Final Thoughts
Dirt Cups are a delightful treat that brings joy and nostalgia with every spoonful. Their versatility allows you to customize flavors and toppings according to your preference. Whether you’re making them for a party or just indulging yourself, they are sure to please everyone!
Dirt Cups
Dirt Cups are a whimsical and delectable dessert that captivates both children and adults with their playful presentation. Layered with creamy chocolate pudding, crunchy crushed Oreos, and topped with colorful gummy worms, these no-bake treats are perfect for any occasion—from birthday parties to Halloween festivities or cozy family movie nights.
- Prep Time: 15 minutes
- Cook Time: None
- Total Time: 0 hours
- Yield: Makes approximately 4 servings 1x
- Category: Dessert
- Method: No-Bake
- Cuisine: American
Ingredients
- 3.4 ounces instant chocolate pudding mix
- 2 cups cold milk
- 8 ounces whipped topping (thawed)
- 10–12 Oreo cookies (crushed)
- 32 gummy worms
Instructions
- In a mixing bowl, combine the cold milk and pudding mix. Whisk until well blended and let sit for 5 minutes to thicken.
- Gently fold in the thawed whipped topping until fully combined.
- Spoon the pudding mixture into serving cups and sprinkle crushed Oreos on top.
- Decorate each cup with gummy worms and chill until ready to serve.
Nutrition
- Serving Size: 1 cup (150g)
- Calories: 260
- Sugar: 22g
- Sodium: 180mg
- Fat: 14g
- Saturated Fat: 7g
- Unsaturated Fat: 5g
- Trans Fat: 0g
- Carbohydrates: 33g
- Fiber: 1g
- Protein: 3g
- Cholesterol: 20mg
